Showing posts with label Gift Ideas. Show all posts

Monday, July 30, 2012

Wedding Shower Cake

This post is mostly about the pretty pictures.

I won't write out the full recipe since I assume if someone is ambitious enough to make a cake of this type, they will be confident enough to choose their own flavors and fillings.

This is a tiered fresh fruit cake with buttercream frosting.  The first layer is mango, the second layer is blueberry, the third layer is strawberry champagne, and finally, an itty bitty mango layer on top.

I flavored the icing slightly differently for each flavored tier.  For the mango, I made a cream cheese frosting.  I paired the blueberry layer with a standard vanilla buttercream.  And for the champagne strawberry, I used a white chocolate cream cheese frosting.

I almost stopped at 3 layers but at the last minute decided to add a fourth!


I dyed each of the frostings to match the cake inside, and filled the layers with the corresponding fruit (blueberries, sliced strawberries, mango chunks).  I also baked some of the fresh fruit into each layer, and added a bit of pure extract to really give it a strong fruit flavor.


I used plastic dowels between each layer to add support, and a couple of straws in the top layer.  The tiers are 12 inches, 10 inches, 8 inches, and 6 inches.  As I added each layer, I used a star pastry tip to pipe frosting along the sides to seal it, and then added edible pastel pearls on each edge.  Finally, I garnished the entire cake with colorful edible flowers.

This took me about six hours, but I think the result was worth it, and the customer said it was delicious!  Yay!


This last picture is funny because of the lighting.  That's daybreak folks... yes, I stayed up all night making this cake!  It was light out when I finished.  What can I say, I'm a dedicated baker!


Monday, April 16, 2012

Festive Homemade Party Poppers


I made these "party poppers" for a New Year's party, but they can be customized to any type of party and would also be fun for a class or children's project, wedding favor, birthday party, etc.  They are fun to make!

Items Needed:
Paper towel, toilet paper, or gift wrap roll (the cardboard from inside)
Tissue Paper
Wrapping Paper
Tape
Scissors
Markers, paint or glitter pens (if desired)
Curling Ribbon
Fun stuff for inside!  Think of it as a tiny pinata.... candy, confetti, mini toys, jokes, riddles, fortunes...  Or for adults; airplane bottles, lottery tickets, etc.
Instructions:
Choose colors according to your theme, or by what you have laying around the house... Because I made these just after Christmas, I used leftover wrapping paper.  One of these papers was a little too holiday happy, so I actually used the inside rather than the outside.

Also, I was able to use the cardboard from inside the wrapping paper itself, so that made this easier than collecting a ton of toilet paper rolls.

To begin, cut the cardboard rolls you are using.  For each popper, you will need two even pieces of cardboard (this is so the popper can be easily snapped apart).  Cut the cardboard rolls into one 4 to 6 inch piece and then cut that in half, keeping the halves as even as possible.  Try to keep the cut pieces together as they will fit back together easier.  Now, this will seem odd, but tape them lightly back together!  Use as little tape as possible so that they can be easily broken apart.

Next, cut  a 12-inch square of tissue paper or lightweight wrapping paper for each roll.  Set each taped roll down in the middle the paper.  Now it is time to fill the popper!  Stuff it as full as possible with whatever festive treats you are using!  Then, roll the popper in the tissue paper.  Secure the popper with curling ribbon (and tape, around the middle).

Once you have tied the ribbon on, you can curl it!  Use a pair of scissors to get it nice and curly.  I used a ton of ribbon to make these very festive.


The next step was the most time consuming.  Cut out two pieces of wrapping paper, one for each side of the popper.  Secure these around the popper with tape, leaving about an inch of the original tissue paper exposed in the middle.  This is so the party poppers will be easy to break in half (see below).


If you are patient, OCD, or utterly insane, as I am, you can cut zigzag decoration into the edges of the wrapping paper.  I did this with whole sheets first, and then cut the smaller pieces from it.  These don't have to be perfect, in fact, I discovered they looked better if they were different lengths.  To make this look really nice, bend the separate pieces of paper forward then backward, which will give a flared look to the end of the poppers.


At this point, the poppers are done.  You can choose to add additional flare with markers, pens or additional ribbons, etc.  I decided to draw tiny martini glasses on these with glitter pens, but the glitter came out a little thick and didn't look as nice as I would have liked.  All in all, these came out cute though, and I will definitely make them again for a different occasion.  Good luck!


Wednesday, April 11, 2012

White Chocolate Marshmallow Tree

This is more of a sudden craft project than a recipe, but it was fun and cute, so I figured I'd post it!

These "tree" foam shapes can be found at any craft store and just cost a couple of dollars.  I have used them before to make appetizer trees.  Here is an example: Appetizer and Dessert Trees.

Anyway, for my New Year's party (yes, just posting about this now...) I purchased a few of the foam shapes thinking I might make something with them and at the last minute, was inspired to create the one you see above.

It was quite simple, if a bit time consuming.  I dipped mini marshmallows in vanilla almond bark, then rolled them in colored sprinkles and lay them out on wax paper to dry.  Once the chocolate was firm, I stuck toothpicks into the marshmallows and attached them in alternating colors to the tree.

The marshmallows tasted delicious with the candy coating and sprinkles, and guests enjoyed grabbing a tiny morsel or two off the tree.  It would be fun to make a very elaborate one with various colors.  Another idea I have seen is to use regular size truffles on the toothpicks, making it into a Christmas or ornamental tree.  Or, you can do a tree entirely of multi colored olives.... so many options!

Thursday, March 15, 2012

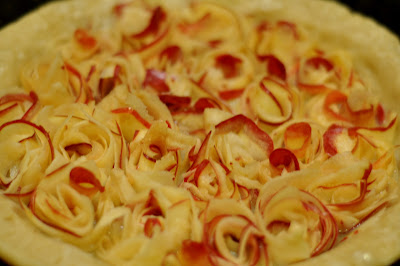
Scrumptious Apple Rose Pie

This post is going to have a lot of pics... because this pie was so pretty!  I found it on Pinterest and the food blogger is located in Belgium, so I had a pretty difficult (and hilarious) time translating her post.  So the recipe is sort of cobbled together... but still delicious!

Yield:  One gorgeous pie

Ingredients:
5-6 apples
2 cups heavy cream
3 eggs
5 tablespoons flour
1 cup brown sugar
1/2 cup white sugar
1/4 teaspoon salt
1 tablespoon vanilla extract
2 teaspoon ground cinnamon

Zest from 1 lemon
1 teaspoon ground ginger

Directions:
If you are making a pie crust from scratch, consider using this recipe - Vodka Pie Crust

To begin, make the cream for the pie.  Mix the heavy cream, sugars, lemon zest, vanilla, cinnamon, ginger, salt and egg yolks in a bowl until frothy.  Add flour and mix until combined.  Set aside.

Next is the time consuming part!  Set out a bowl of cold water to keep the apples from oxidizing.  Do not peel the apples.  Using a vegetable peeler, make ribbons of the apples.  The easiest way I found to do this was by holding the bottom of the apple in my palm and running the peeler up and down the length of the apple.  Try to make the peels as thin as possible.  They don't have to be of uniform shape or size, as you will be wrapping them into these roses, and it will be fairly easy to conceal any imperfections.

As you can see, I had extra pie dough, so I also made mini muffin sized apple pies, with one rose in each.


Once you have peeled the apples (your hand will be tired!), it is time to start assembling them.  Set aside some of the pieces with more red, or the pieces that look more like leaves.  Begin with a peel at a time, wrapping them around each other.  Once you have a small bundle that resembles a rose, you can enhance the effect by sticking one or two of the smaller red pieces in the middle.

Pour the cream into the pie shell and each time you assemble a rose, place it standing in the cream.  You may have to press down a bit to get them to stay.  Start from the outside going in, and they should hold up pretty well.


Once you have filled the pie crust with roses, sprinkle the top with a bit of additional brown sugar and cinnamon.  Bake in the oven at 350 degrees for about an hour, or until the cream has set and the top of the pie is browned.


Tips -  To make mini apple pie roses, use a mini muffin pan and follow the same process.  I used the vodka pie crust recipe and was able to make 1 pie and a dozen mini rose pies, using the additional dough that was meant as a pie top or double crust for the minis.  Enjoy!

Thursday, March 8, 2012

White and Milk Chocolate Peanut Clusters

Kyle's mother taught me this recipe, which is so easy and delicious that I don't know why people don't make these more often!

Yield: 20 - 30 peanut clusters, depending on how large you make them

Ingredients:
1 jar (16 oz) roasted, salted peanuts
Almond bark (chocolate or vanilla, or both!)
Wax paper

Directions:
This is so easy, you could figure it out with me writing a word!
 
Spread out a sheet of wax paper.  Melt the almond bark in the microwave for about 30-60 seconds (about 3-4 blocks at a time, otherwise it will get hard before you finish making these).  Make sure to mix the chocolate about halfway through, and avoid overheating, as it will burn and become unusable.  If you melt it about halfway and then remove it, the heat of the melted parts will carry over and melt the rest.

Next, place small mounds of peanuts on the wax paper.  Spoon the chocolate over each mound, being sure to cover all the peanuts.  That's it!  Allow to dry about ten minutes, and then if necessary, add extra chocolate to cover up any imperfections.

Tips:  If you don't tell anyone how easy this was, they will never know!  I served these on silver platters and they looked elegant and expensive... I didn't let on that they only took about ten minutes to make!  Sweet and salty....  Enjoy!

Tuesday, February 7, 2012

Cinnamon Vanilla Bean Infused Rum

  
This was a delicious combo.  The rum turned a beautiful amber shade within a day as the vanilla bean and cinnamon melded with the liquor.

Yield:
One bottle of infused rum

Ingredients:
3 cups rum
2 vanilla beans
4-5 cinnamon sticks
3 tsp white sugar

Instructions:

Choose a decorative glass bottle and make sure it is clean.  Slice the beans lengthwise and combine with rum.  Add cinnamon sticks one by one, then pour in sugar. 
Shake well and store in a cool, dark place for 1–5 weeks.  I let mine infuse for about 2 weeks and it was really delicious and fragrant.

After a day or so, you will notice the rum changing color.  Some of the cinnamon sticks may unroll (see below).  If you do not like the way that looks, when the rum is finished you can strain it, then add new cinnamon sticks and an unsliced vanilla bean to the bottle of strained infusion.

Drink on the rocks, or mix into cocktails.  I also mixed this into a hot toddy when I had a cold and it was pretty good.  Enjoy!

Wednesday, January 11, 2012

Pineapple Infused Tequila

So this is a fun gift idea - or make it for yourself!  Either way, it is delicious.

Ingredients:
750 ml of your fave tequila (I used Patron Silver)
1 20 oz can of pineapple
2 tsp white sugar
A large bottle or jar with an airtight lid

Directions:
This is a very simple recipe, in fact, I would say it's nearly impossible to mess up.  Choose a bottle before purchasing the ingredients, as that will determine the amount of tequila and pineapple you use.  For this infusion, I used a tall bottle, and for that reason I used Dole Pineapple Tidbits, which are basically small chunks that I knew would fit within the narrow neck of that particular size bottle.  If I were using a mason jar or pitcher, I would probably use the rings, because I think they look prettier.

Next, decide if you would prefer fresh or canned pineapple.  I have used both.  The fresh pineapple doesn't last as long in the bottle (meaning you will need to strain the liquor sooner) and is more time consuming to cut up; however, it does have a fresher and more intense flavor.  If you do use fresh, I would suggest adding an additional teaspoon of sugar.  If you use canned pineapple, simply choose which type according to which type of bottle you plan to keep it in.

Finally, place pineapple into the pitcher/jar.  Add sugar.  Fill container to the top with tequila and close.  Let marinate for no less then 24 hours.  For the strongest flavor, wait 1-2 weeks before consuming.  Once ready, the tequila can be mixed into pineapple margaritas, cocktails, drunk straight or in shots - just remember, this is still straight tequila, so don't drink it like water!  The pineapple should keep in the bottle for about a month, a bit less if fresh.  If the pineapple begins to discolor, simply strain the liquor and discard the pineapple.  Usually this delicious elixir will be gone before you have to worry about that.  Enjoy!

Saturday, December 24, 2011

Candy Coated Pretzel Rods


This is actually easy. I often say that things are easy and people argue with me that they aren't - but this really is!   I swear!

Ingredients
:
Pretzel rods (1 bag, or as many as you care to prepare!)
Almond bark (vanilla and chocolate, or either)
Toppings (let your imagination go wild - mini chocolate chips, colored sprinkles, chopped nuts, toasted coconut, cookie crumbs, crushed candy canes, etc)

Directions:
Lay out a long piece of wax paper. Place almond bark in a microwavable bowl and microwave at 30 second intervals, stirring after each interval, until chocolate is melted and smooth.

Dip half of each pretzel rod into melted chocolate, then sprinkle with, or roll in, toppings. Do this quickly, before chocolate hardens, then place carefully on wax paper. If you do not want to add a topping, or for a different look, drizzle dipped pretzel rods with a contrasting color or flavor of melted chocolate.


Place decorated pretzels on wax paper and let dry, about 5 to 10 minutes. These do not need to be refrigerated, in fact, they are better if they are not, as almond bark tends to crack if exposed to moisture.

Tips:
Don't worry too much about how the backs of the pretzels look - just add the toppings as fast as possible, let them dry, and then if needed, add additional chocolate or toppings to the back to cover any imperfections.

These make great gifts. Lay them on a platter, place them in a jar and decorate with ribbon, or make a "bouquet" of pretzels and wrap in cellophane.

Sunday, June 26, 2011

Give the Gift of a.... Mystery Trip!

So unless you're a Count, or Oprah, this is an idea that you might use only for a special occasion, or after you have come into a bit of extra cash - a tax refund, a bonus, a jewel heist, etc.

The idea is to give someone the gift of a surprise trip.  I have done this twice; once with a close friend, and another time for my current boyfriend.  You can either make it a complete surprise, if you're positive the person will be available, or you can let them know about the "mystery trip" and make sure they keep the dates clear, but not reveal the details.

The first time I did this was for my friend Roxann.  I took her to New York.  Neither of us had ever been, and she didn't know for sure where we were going until we got to the airport and printed out our boarding passes.  Part of the reason I chose New York was that Paul McCartney was playing at Madison Square Garden that weekend.
Something funny happened as soon as we arrived in the city.  I had planned the trip partially based on the McCartney concert, which my friend had no idea was going on. When we exited the subway, literally the first thing we saw was an enormous billboard advertising the concert.  It was literally festooned across an entire side of a high rise building, just outside the subway exit.  I thought my friend would notice and the jig would be up, but she made no mention of it.
I printed out the itinerary I had come up with (Statue of Liberty boat cruise, lunch at Tavern on the Green, MSG concert, getting on the list at a hot club, etc) and covered the destinations with post-it flags.  A few hours before each event, I would have my friend pull off one of the flags and reveal our next destination.  It was a fun game and a memorable trip.
Here we are on a windy and hot boat cruise that ended with Roxy looking wistful in front of the statue.
The smallest person to ever visit Times Square...

A couple of years later, I decided to do a similar thing for Kyle.  We had been dating for about a year and I wanted to take him somewhere special for a weekend.  He had never been to New York, so once again I used that as my mystery trip destination (what can I say? It's a cheap, short flight, and there's lots to do there!).  I took him to different places (a Broadway show, an expensive French restaurant, a Brooklyn bar for beer enthusiasts) and once again employed the post-it flag trick for our itinerary.  We had a grand time!
For some reason, Kyle decided to act like a real New Yorker and look furious in every picture.
Still angry....
On the way to a fancy restaurant and feeling either melancholy or resentful about it.... but still catching a great lean against that wall.
Tips  - Make sure the person you want to take on a trip is available and doesn't mind traveling.  Make it a short weekend trip - 3 days is ideal.  Plan the itinerary around your travel companion's interests, and have a "surprise" for every day.  It doesn't have to be expensive - museums are cheap and sometimes free, and so are landmarks. Sometimes the simplest things can be the most memorable - eating a messy and delicious meatball sandwich at a street corner NYC deli, discussing controversial art at a famous museum, having a frosty beverage at a place with a view.  There is something truly rewarding about planning the perfect trip for someone else and seeing the look on their face as they discover what you have organized.  I highly recommend it, if that jewel heist goes off without a hitch.  Good luck!

Wednesday, May 25, 2011

Jolly Rancher Vodka

Recently, I had the idea of infusing my own liquor and was planning to do a fruit infusion.  As occasionally happens, I stumbled into a bar, had a conversation with a bartender, and found out something incredible. Well, at least, in my drunken state, it seemed incredible!  The bartender told me that the "newest thing" is to infuse liquor with candy.

I immediately consulted the World Wide Web, and discovered that candy infused vodkas are very popular, particularly Skittles and Jolly Rancher.  Who knew?!  It sounded so delicious that I immediately invested in a large quantity of vodka (Smirnoff) and Jolly Ranchers.

Ingredients:
1.75 liter bottle of vodka
3.75 lb bag of Jolly Ranchers
5 glass bottles with stoppers

Directions:
You can modify this recipe to whichever bottles you get (there are many different sizes and shapes available). 
The bottles I got were 17.5 oz capacity and cost less than $5 each


Here's where I purchased the bottles:

http://stonebrothers.com/products/detail-3035945-Bormioli-Pocket-Flask-17-oz.
The vodka doesn't need to be expensive– the Jolly Rancher flavor should smooth out any cheap vodka bumps!  I used 24 Jolly Ranchers for each flavor.  Note - the flavors in each bag are totally random.  The first couple of small bags I bought had a disproportionate amount of watermelon and blue raspberry, which is why it is smart to just get the big bag, which has around 40 of each flavor.  That way you'll have plenty of leftover Jolly Ranchers, for eating or future infusions.
Start by unwrapping and separating the Jolly Ranchers by flavor.  The five flavors are apple, cherry, grape, blue raspberry, and watermelon. This is literally the most time consuming and difficult part.  Once you've unwrapped the first 100 or so, you might be exhausted!  But don't worry, you're nearly done.  Drop the separated candies into each individual flask.

Next, pour in the vodka.  You can use a funnel or just be careful not to spill!  Fill each bottle to nearly the top of the neck.  The vodka will begin to take on the color of the Jolly Ranchers immediately, as it begins breaking down the candy.
Put your flasks into the refrigerator and let them chill for a couple of hours. Return to shake every few hours, to encourage the candy to dissolve.  The flasks should be ready in 10-24 hours - the more you shake it, the faster the candy disappears.  It is actually a little disconcerting how fast they dissolve.... it makes you wonder what vodka does inside your stomach!
I made mine during the day, and they were ready the very next evening.  Luckily I had the common sense to stop on the way home and get a bottle of Sprite! 
These look very pretty when they are finished and would make great gifts.  I am planning to label a few bottles for that very purpose.
They are also incredibly delicious, so another option is to keep them all for yourself!  When they were ready, we tried all of the flavors and argued over which was the tastiest.  Major contenders were watermelon and the green apple, but honestly it's hard to choose because they all taste so intense.  Yum!
Be careful though - it honestly tastes so good, it is easy to forget that it's basically pure vodka.... which can lead to headaches, nausea, and unexpected sick days!
You can mix any of the flavors with club soda, 7-up or Sprite, or just serve over ice.  Or make a martini!  Either way, I suggest keeping the vodka chilled, cause it just tastes so much better that way.


Other variations on the recipe that I saw used rum or tequila instead of vodka, but that seems like it would interfere with the flavor of the candy.


All in all, this was a fun, easy, and cheap project that resulted in a delicious, drunken night.  I am planning to experiment with Skittles next, before I move on to something sophisticated and adult (snooze!) like fruit.  Cheers!

Friday, May 20, 2011

Throw a Rock Band Party

Last year, for Kyle's birthday, he didn't want a big shindig.  So, I just flew two people in from out of town to surprise him, made a cake shaped like a guitar, and gave him a Rock Band party!  I did honor his wishes in a small way, by only inviting about 10 people.
Kyle's friend Sean flew in from California.  I pretended to have plans and went to pick him up from the airport.  On the way back to the apartment, I had a brilliant idea to dress him up like a present, so we stopped and bought some wrapping paper and ribbons and bows.  Sean lay down on the floor in front of our door, covered in paper and embellishments.  Needless to say, when Kyle answered, he was quite startled.
I decorated the cake exactly like Kyle's bass.  This was not an easy cake to conceal all day!
I also flew in my beloved brother Lee.  When we first bought Rock Band, he was a legendary member of our band (Leah Jean & the Rippers!), so we couldn't have the party without him!
My friend Kate and I dressed up for the occasion.  Finally, an opportunity to wear the leather leggings I had bought on a whim months before!  And the sequin vest, ahem - don't ask, I have crazy ideas about the sort of items that need to be added to my wardrobe.
As you can see from the pics, we pretty much all enjoy a chance to dress up like fools.
I also got a pinata for the event.  They didn't have anything with the proper theme, so I got a winking pirate. Also, since it was the dead of winter, we had to do this in the dining room!
The pinata didn't last very long...
Then we had a little dance party.
And finally, the main event, the game!
Rock and roll will never die.