Friday, April 26, 2013

Bacon & Egg Breakfast Tacos

This is an easy and yummy breakfast to whip up over the weekend.  Make it a bit more special by making homemade tortillas or salsa verde; recipe links below ; )

Yield:  4-6 medium sized tacos

Ingredients:
6 medium eggs, scrambled and seasoned to taste
1 cup shredded hash browns, fried and seasoned to taste
6 slices bacon, fried, drained, and crumbled
1/2 cup shredded cheddar cheese

Flour tortillas, cIlantro and salsa, for serving

Directions:
Make bacon first, drain, crumble and set aside.  Fry hash browns until crisp and season to taste, reserve.  Scramble eggs to desired doneness and season with salt and pepper.

Brown tortillas for a few minutes in a pan or griddle.  Scoop hash browns and scrambled eggs into warm tortillas and top with crumbled bacon and cheddar cheese.  Garnish with cilantro and salsa, if desired.  Voila!  Easy breakfast!  

Check out my recipe for Roasted Tomatillo and Garlic Salsa and/or Homemade Flour Tortillas
if you are feeling like going the whole nine yards!  Enjoy!

Thursday, April 25, 2013

Pineapple Rum Punch

All right, I'll be honest - I didn't fly to Ixtapa to mix this drink, take a photo, and fly right back.  The truth is we drank this punch so fast, I forgot to take a photo of it, and stole this one from the trusty old internet.  Sue me!  Wait... don't. 

Yield:  1 large pitcher, approximately 8-10 servings

Ingredients:
2-3 cups ripe pineapple chunks (or about 1/2 a fresh pineapple)
3/4 cup white sugar

2 cups dark rum
1/2 cup lime juice
3 cups club soda or sparkling water
1 bottle Spumante or other sweet sparkling wine
Lime slices


Directions:
Add pineapple chunks, sugar and rum to the bottom of a large pitcher and muddle gently.  Add club soda and mix.  Refrigerate for at least 30 minutes or up to overnight to allow flavors to come together.

Just before serving, mix in sparkling wine and pour into ice filled glasses.  Garnish with lime slices.  Cheers!

Tips:  Make sure to taste the pineapple; if it's not ripe enough, you might want to add more sugar, depending on how sweet you want the finished product.

Blackberry Mojitos

It's that time of year again!  Time to make fruity, frothy, rum and vodka filled cocktails and enjoy them in the sun! 

YieldApprox 4 cocktails, multiply for a large pitcher

Ingredients:
1 8 ounce package fresh blackberries (reserve a few for garnish)
10-12 fresh mint leaves (reserve a few for garnish)
6 ounces dark rum
4 tbsp white sugar
1/2 cup lime juice

3 cups club soda, sparkling water, or lime flavored soda
1-2 fresh limes, quartered

Directions:
In the bottom of a glass or pitcher, muddle the blackberries, mint leaves, sugar, rum and lime juice.


Add ice cubes, then top off with club soda or other sparkling beverage.  Garnish with a few whole blackberries, a sprig of mint, and a lime wedge.  Cheers!


Wednesday, April 24, 2013

Gooey Maple Bacon Cinnamon Rolls

I don't think I have to tell you that this recipe turned out very nicely.  The entire pan was gone when I woke up the next day, so that alone can vouch for the recipe's success, at least in my household.

Yield:  Approx 12-15 cinnamon rolls

Cinnamon Roll Ingredients:
2 1/4 tsp rapid rise yeast

1 cup milk
1/2 cup white sugar
4 tbsp melted butter
1 tsp salt
1 egg
3 ½ cups all-purpose flour

9 slices bacon
2 tbsp brown sugar

Cinnamon Filling:
3/4 cup brown sugar
2 tbsp ground cinnamon
1/2 stick melted butter 

Maple Frosting Ingredients:
1 stick butter, room temperature

1 8 ounce package cream cheese, room temperature
2 cups powdered sugar
1/4 cup maple syrup

2 tsp vanilla extract 

Instructions: 
Fry bacon (or cook in the oven at 400 degrees for about 15 mins, faster and less messy!) and set aside to drain.  Once cooled, crumble bacon and place in a bowl.  Add about 2 tablespoons of brown sugar and mix to combine, then reserve.

Dissolve yeast in warm water according to package directions and set aside.  In a separate bowl, combine milk, white sugar, melted butter, salt and egg.  Fold in 1½ cups of flour and mix to combine.  Add yeast mixture.  Stir in remaining flour and knead for 5-10 minutes.  Spray a bowl with non-stick cooking spray, place dough in it, and cover.  Allow to rise for around 90 minutes, or until doubled in size.


Roll dough out into a large rectangle and coat with about 1 tablespoon of melted butter. Cover with the cinnamon filling mixture and add about half of the bacon bacon-sugar mixture. Roll up tightly, beginning with long side.  Slice into 12-15 sections, or more if you want slightly smaller rolls.

Arrange rolls in a baking pan (I used two round ones) and allow to rise for an additional 20 minutes or so.  Bake for about 30 minutes at 350 degrees, or until slightly brown on top.

While the rolls are cooking, use a mixer or whisk to combine ingredients for the maple glaze.  Mix until smooth and to desired consistency; for a thicker frosting, use more powdered sugar, for a thinner frosting, use additional maple syrup, or water or milk, to thin it out.

Frost rolls and garnish with remaining diced bacon.  Serve while warm. Sweet...salty...delicious!  Enjoy!


Tuesday, April 23, 2013

Smoked Chile and Mango Guacamole

This was delicious; the mango added a very light touch of sweetness and the smokiness of the chipotle complemented the other flavors perfectly.  Great on tacos or just with chips!

Yield: About 3 cups

Ingredients
1 cup cherry tomatoes, quartered
1 small red onion, diced
2-3 canned chipotle peppers, rinsed and diced
3 avocados, halved, pitted and diced
1 mango, seeded and diced
1 jalapeno, seeds removed, minced
1/4 cup fresh lime juice
1/2 cup cilantro, chopped
Salt and pepper, to taste
Tortilla chips, for serving

Directions:
Remove chipotle peppers from can and rinse, then chop and place in a mixing bowl.  Add the cherry tomatoes, onion and jalapeno, cilantro, lime juice and mango to the bowl and stir.  Gently stir in diced guacamole; since this is a chunky style guacamole, you want the avocado to hold it's shape as much as possible.


Season to taste with salt and pepper.  Garnish with additional cilantro and serve with tortilla chips or on tacos.  Or maybe with a freshly poured margarita?  Yum!


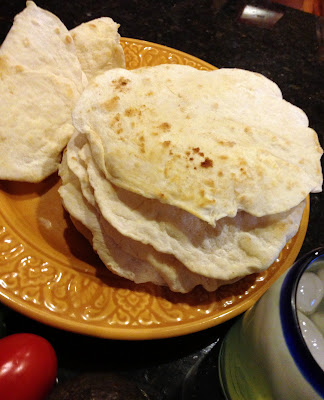
Homemade Flour Tortillas

This is so easy you won't believe it, and they do taste better than grocery store flour tortillas; less gummy, more flavorful.  Hooray! 

Yield:  8 large or 16 medium tortillas

Ingredients:
2 cups self-rising flour

2 tsp salt
3/4 cup water
3 tablespoons olive oil


Directions:
Combine flour and salt in a bowl, then stir in water and oil.  Using your hands, form dough into a large ball and place onto a floured surface.  Knead dough for a few minutes, adding a little flour or water if needed to achieve a smooth dough.  Let rest for at least 15 minutes.


Divide dough into round portions.  For large tortillas, you would make 8 balls.  I decided to make smaller tortillas, so I made 16.  Roll each portion into a thin circle with a rolling pin.


To cook the tortillas, use a skillet or griddle set to medium high.  Use butter or cooking spray lightly to oil the pan before cooking each tortilla.  Cook for about 1 minute on each side or until lightly browned.  Serve while warm, or the tortillas can be reheated in the microwave. 

Tips:  These will keep in the fridge for at least a week, or indefinitely in the freezer (separate with parchment paper).  in order to achieve a round tortilla, lift and rotate the tortilla after every single roll with the rolling pin.  I like them thin, so I rolled them quite a bit, but you can also make them thicker for a more rustic feel.  Enjoy!


Monday, April 22, 2013

T-Bone Steaks with Roasted Garlic Adobo Potatoes and Garlic Herb Butter

I was at Costco innocently buying groceries when I ran across these giant prime t-bone steaks, on sale... Needless to say, they went straight into my cart, no questions asked!

Here is the link to the potatoes I made to go with the steaks; they turned out really good: Spicy Garlic Adobo Roasted Potatoes

For those of you that don't know, the t-bone is actually comprised of two cuts of meat; the tenderloin and the New York Strip.  Meat is more tender and flavorful when cooked on the bone, so you can't go wrong with t-bone (well, overeating could be an issue!).  Prime is a grade of meat and is more heavily and evenly marbled with fat, which marinates it naturally during the cooking process, resulting in a more juicy and tender end product.  Prime cuts of meat are usually quite expensive, but sometimes you can find a deal at Costco or your local butcher.
 

Here is a pic of the marbling on these particular steaks.  Even when you purchase lower grade meat, you can find yourself a better steak by choosing the ones with the best marbling, so look for long thin veins of white scattered throughout the steak.

Yield: Serves 2-4 

Ingredients:
2 large t-bone steaks (these were 1 1/2 lbs each!)
2 tsp olive oil
1 tsp garlic powder
1 tsp kosher salt
1 tsp black pepper
1/2 tsp cayenne pepper

Garlic Herb Butter:
1 lb butter, softened
2 garlic cloves, finely minced
2 tsp fresh parsley, chopped
2 tsp fresh oregano, chopped
1 tsp fresh basil, chopped
1 tsp lemon juice
Salt and pepper, to taste 


Directions:
To make the herb butter, bring butter to room temperature.  Mince garlic and chop herbs (any herbs can be substituted here, depending on your own preference).  Whip herbs, butter, and lemon until creamy and then season to taste.

There are a lot of fun ways to store and serve homemade butters.  The most common way is to layer it onto saranwrap and then roll into a log.  Chill or freeze until solid, then peel saranwrap back to slice pats of butter from end.  The butter can be stored in the freezer for up to a year.  You can also form balls (butter balls!) with a melon baller or press it into molds for other shapes.  The butter should be chilled until firm (1-3 hours) before serving, otherwise it will not hold the desired shape. 

To make steaks, bring steaks to room temperature and pat dry.  Heat a grill pan or outdoor grill to high.  Mix spices in a small bowl.  Drizzle olive oil over steaks on both sides, then season with spice mix.


Place steaks on grill and cook for approximately 4-6 minutes per side (depending on desired doneness), rotating 90 degrees once halfway through cooking time to create hash marks.  Flip and repeat.  Top with a slice of garlic herb butter and allow to rest for at least 5 minutes before serving.  Mmmmm.... beef!  Hungry yet?


Spicy Garlic Adobo Roasted Potatoes

I found these thick prime t-bone steaks at Costco on sale so I had to make a special potato dish to go with them.  I love adobo seasoning and use it a lot in fish tacos, on pork chops and chicken, etc.  It's usually marked as "adobo sazon" and you can find it in the Mexican aisle of the grocery store. 

Yield: 4-6 servings
3 pounds red potatoes, cut into bite-sized wedges
8 garlic cloves, peeled
2 tsp olive oil
2 tbsp adobo seasoning 
1 tsp ground oregano
2 tbsp melted butter
Salt and black pepper, to taste 

Directions:
Preheat oven to 400 degrees.  Wash potatoes and cut into wedges, then peel garlic.  Toss the potatoes and garlic cloves in olive oil and spices until well coated.

Transfer the potatoes to a baking sheet and spread out into one even layer (if necessary, use two sheet pans; it's important they are in one layer, otherwise they won't brown properly).  Cook in the oven for 45 minutes to an hour, or until the skin is crisp, the cener is soft, and the potatoes are brown.  Remove and toss with melted butter; season to taste and serve while hot.

Here is the link to the recipe for the T-Bone Steaks with Garlic Herb Butter.  Enjoy!


BBQ Bourbon Bacon Shrimp and Sharp Cheddar Grits

I had never made grits before and needed to make them for an event, so I scoured the web for the best sounding recipe I could find!  The only major change I made to this recipe was the addition of a little crumbled bacon (how could I help myself?).  The barbecue sauce is so good that you could easily omit the bacon and still have a lovely dish.

The best part about this recipe is that the woman who posted it claims to have gotten 3 marriage proposals and rave reviews from Jesse Jackson, so you can see this comes highly recommended!

Yield: 4-6 servings

Sharp Cheddar Grits:
4 cups chicken stock
1 cup quick or old fashioned grits
1/2 stick butter
1/2 cup heavy cream

2 garlic cloves, minced
1 1/2 cups sharp cheddar cheese
Salt and black pepper, to taste


Bourbon Bacon BBQ Sauce:
4 bacon slices
1 small onion, chopped
2 garlic cloves, finely minced
1 1/2 cups ketchup
1/2 cup bourbon

1/2 cup brown sugar
1/4 cup apple cider vinegar

2 tablespoons honey
1/2 teaspoon cayenne pepper

Salt and black pepper, to taste

Shrimp:
1 1/2 deveined raw shell-on shrimp

2 tbsp butter
Salt and pepper

Optional Garnish:  Parsley or chives, for color 

Directions: Begin by making the barbecue sauce (this can be done up to a week in advance, simply store in an airtight container and stir thoroughly before using).  Cook bacon in a frying pan until crisp.  Remove and reserve, setting on paper towels to drain grease.  Once the bacon has cooled, crumble and reserve for garnish.

Add the chopper onion and garlic to the bacon grease and cook until soft.  Stir in ketchup, brown sugar, bourbon, vinegar and honey.  Simmer for 15 minutes, then add spices and season to taste.  Remove from heat and set aside.

Next, make the grits.  In the bottom of a pot, cook minced garlic in a bit of butter until soft.  Add the chicken stock and bring to a boil.  Slowly stir in the grits.  Reduce heat to medium low and cook, stirring frequently, until the grits are tender, or for about 30 minutes.  There truly is a lot of stirring involved as you don't want these to get clumpy!

While the grits are cooking, grill the shrimp.  I used a grill pan for mine, but these could also be thrown onto the grill.  To grill them on a grill pan, heat the pan to high.  Melt butter in the microwave and toss the shrimp in the butter with a bit of salt and pepper.  Grill on each side for about 2 minutes or until opaque.  Remove from heat, toss shrimp in barbecue sauce, and set aside.

When the grits are creamy and to the desired consistency, remove from heat and stir in the cheese, butter and cream.  Season with salt and pepper.

To serve, spoon grits into a bowl and top with shrimp, crumbled bacon, and chopped parsley or chives.  Yum!  Enjoy! 

Tips: I was paranoid about the grits, as it was my first time making them, so I looked up a bunch of tips online before I started.  One thing everyone warned against was using "instant" grits" which are apparently different than the quick grits I used (Quaker Quick Grits).

Also, on the package of the quick grits it says 5 minute cooking time, but I read all over that isn't true, so I cooked mine as people suggested (about 30-45 mins) and they turned out great.  I don't think there is any end to the amount of butter and cream these grits could soak up, or salt and pepper, so use your own judgement as to how buttery, salty or creamy you want them!  Good luck!


Sunday, April 21, 2013

Fresh Fruit Flower Cut Outs

 
This is almost more of a craft exercise than a recipe, but it's a fun idea for a special event and these are super easy to make.  Besides, hello, they are gorgeous!

So for most of the fruit flower shapes, I used a small flower cookie cutter set that I got online a few years ago.  The company who makes it is called Fox Run and I'm sure it could still be found online.  Those are about the size of a quarter, so they made perfect bite-sized pieces.

Here's a pic of the set.


The fruits I used were strawberries, honeydew melon, cantaloupe and pineapple, but this would work with most firm fruits and melons.  The pineapple was a bit more difficult to shape, but still came out pretty (well, I just ate the ugly pieces ; )


I got the colorful flower shaped bowls at Home Goods.


The strawberry hearts I cut out by hand, but it's super easy to do.  Simply remove the core by slicing a v shaped cut out of the top of the strawberry.  Then slice a very thin slice of the end of the strawberry on both sides, which will reveal the white inside.

Cut the strawberry in half, and voila, two strawberry hearts!  Some of the strawberries will be natural hearts, but if your cut is slightly off or the strawberry is misshapen, it's quite simple to correct with a bit more surgery with your paring knife.  Save the cut edges and use them to make a fruit puree or butter.


This is the display I did for a catering event with this fruit.  I scattered fresh flowers about and placed a few huge bunches of grapes in bowls.  The guests loved the fun presentation!


The fruit can be cut and stored in an airtight container up to 48 hours in advance.  Simply drain and pat dry before serving (to avoid mushiness).  Enjoy!


Tuesday, April 16, 2013

Slow Cooker Pepper Steak


I ate this a bit too early, and it wasn't quite as tender as I'd hoped.  Two hours later, it was heaven!  The moral of the story is, patience is a virtue when it comes to crockpot cooking!  I think 6-9 hours would be perfect, so this is a dish you might want to put on before you leave for work in the morning.

Yield8 servings

Ingredients:
2 pounds flank steak, cut into approx 2-3 inch strips
3 tbsp sesame oil
1/2 cup soy sauce
1/2 cup lime juice
1 large white onion, thinly sliced
6 garlic cloves, minced
1 tbsp brown sugar
1 tsp salt
1 tsp black pepper

2 tbsp fresh minced ginger
1 16 ounce can diced tomatoes, undrained
1 green bell pepper, julienned
1 red bell pepper, julienned
1 orange bell pepper, julienned

2 tbsp cornstarch + 2 tbsp water (reserve for end) 

Rice or noodles, for serving

Garnish (optional):  Chopped cilantro
 
Directions:
Place beef strips into the crockpot.  Add sesame oil, soy sauce, lime juice, undrained canned tomatoes, onion, garlic, ginger, brown sugar, and seasonings and mix with a large spoon. Cover and cook on low for 6-9 hours, or until meat is tender.


If you would like the peppers super soft, add them during the first stage of the cooking process.  For less well done peppers, add them during the last hour.  Any kind of peppers would work; I chose three colors for presentation; yes, they're pretty!

About a half hour before serving, mix water and cornstarch into a paste and stir into the sauce in the crockpot.  This will thicken the sauce into a gravy.  Serve the meat and veggie mixture over noodles or rice, with some of the gravy ladled over it, and chopped cilantro on top, if desired.  Yum!

Tips:  I restrained myself because I always make everything spicy, but I don't think a bit of Thai chili or Sriracha sauce would be out of place here... just a thought!  Enjoy!

Monday, April 1, 2013

Spicy Chilaquiles Omelet Pinwheels

I made these omelet pinwheels a few weeks back and of course you can customize the ingredients endlessly, but I thought a chilaquiles version would be fun.  Putting the chips on toward the end keeps them quite crispy and this was absolutely delicious, not to mention adorable.  Yum!

Yield:  6-8 servings

Ingredients:
Cooking spray or olive oil, for pan
1 cup milk
1/3 cup all-purpose flour

8 large eggs
1 cup cooked chorizo, drained

1/2 cup canned pinto beans, drained and rinsed
1/2 cup Monterey Jack cheese
1/2 cup sharp cheddar cheese
3/4 cup tortilla chips
1 tsp garlic powder
1 tsp adobo seasoning
1/2 tsp cumin
Salt and pepper, to taste

Optional Garnishes:

Cilantro
Salsa Verde
Additional tortilla chips
Sour cream
Directions:
Preheat oven to 350. Spray a rimmed baking sheet with cooking or olive oil. Line the bottom of the pan with parchment paper, allowing some to hang over on the longer ends. Spray the top of the parchment with oil as well.

In a bowl, whisk together milk and flour. Add eggs and spices and whisk to combine. Pour into pan. Sprinkle the chorizo and beans over the eggs in an even layer.

Bake until the omelet is set, about 10-15 minutes. Remove from the oven and sprinkle with cheese and tortilla chips. Return to the oven for an additional minute or two to melt the cheese and brown the chips.

Use a spatula or butter knife to loosen omelet on all sides. Beginning on one end, lift the parchment and roll the omelet tightly, peeling back the parchment paper as you go. It is a bit delicate so be gentle. Once rolled, allow to set for a few minutes - the cheese will bind the roll together. Then slice and serve while still warm.


White Chocolate Macadamia Cookies

This is a classic chocolate chip cookie recipe, but with white chocolate and macadamia nuts.  These white chocolate discs are a nice change because they are larger than regular chocolate chips and are pretty too; you can find them at gourmet food stores. 

Ingredients:
3/4 cup dark brown sugar
3/4 cup white sugar 

1 cup butter, softened
2 tsp vanilla extract
2 eggs
2 cups all-purpose flour
1 tsp baking soda
1 tsp salt
1 cup white chocolate discs or chips 

1 cup macadamia nuts, halved

Directions:
Heat oven to 375.  Combine brown sugar, sugar, butter and eggs and beat until light and fluffy. Add vanilla extract and blend well.


Incorporate flour, baking soda and salt, then fold in white chocolate chips and macadamia nuts. Drop dough by large tablespoonfuls onto an ungreased baking sheet.

Bake for 8 to 10 minutes (or longer for crisp cookies). Cool  before removing from cookie sheets.  Enjoy!